No Sugar Added Apple Cinnamon Fruit Leather
Did you have a good Labor Day weekend? I sure hope so! Labor Day usually marks the end of reliably nice weather in Seattle, and we had a wonderfully sunny three days. Labor Day, of course, also marks the end of summer break for the school kids, which means time for school lunch planning.
I, most children of the late ‘70s and ‘80s, grew up with a phenomenon called the Fruit Roll Up. Fruit Roll Ups were a great lunchbox dessert – they lasted a long time and provided for ample “playing with your food.” And, they were fruit, or, at least that’s what the box said.
All good, right?
Except, that pre-made Fruit Roll Ups contain very little fruit.
Who knows what they contained when I was a kid, but here is a nutrition label from current day strawberry-flavored fruit rollups. In addition to the fact that they’re mostly made of a variety of sugars and packed with food dyes, might I also point out that there are not actually any strawberries in the strawberry flavor? Oh, the humanity.

If you’re looking for lunchbox treats to greet back-to-school season, might I suggest a homemade fruit leather that you can feel good about sending with your kids? This would even be a good project that you could work on together, depending on their ages.
The new crop of Washington apples is available, always a wonderful treat, so this is an apple flavor, but really, any fruit should work. I used raisins and coconut water to avoid adding any additional refined sugar, but, you could certainly add a sweetener if your fruit isn’t sweet enough. For what it’s worth, this version passed the 2Chilitest – he felt they were amply sweet – that’s saying something! And, as reader Cathy suggested, you could get really creative and use veggies!
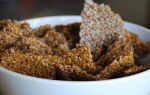
When it comes to drying times, you’ll know it’s done when you can peel it off the dehydrator fruit roll tray. If it is still too moist, it won’t peel off the sheet. I made this twice, and both times I removed strips from the edges first after about 6 hours and put the middle back in to dry for about another hour.
I really think this project is best in a dehydrator, but you can do it in an oven as well (instructions below).
What are your favorite fruit leather flavors? Please share in the comments!

No Sugar Added Apple Cinnamon Fruit Leather
Recommended Ninja Blender Jar:
- Ninja Pulse: 40 ounce jar with standard blade
- Ninja Professional Blender: 72 ounce jar with standard blade
- Ninja Kitchen System: Food processor bowl and blade
- Ninja Mega Kitchen System: Food processor bowl and blade (either standard size or mini)
Ingredients:
- 2 generous cups chopped apples (2 medium)
- 1/2 cup coconut water
- Juice from one large or two small lemons
- 1/4 cup raisins, packed
- 2 teaspoons cinnamon
- Choice of sweetener to taste, if required (suggest coconut sugar, pure maple syrup, honey, or liquid Stevia)
Method
- Dice apples and add to small pot with water, lemon juice, raisins, and cinnamon
- Bring to a low boil, reduce heat, and simmer about 15 minutes until apples are soft and liquid has thickened to a syrup consistency

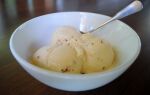
- Let cool for about 10 minutes, taste, and determine if you need to add any sweetener

- Add to your blender (if Ninja) or food processor, and puree until mostly smooth (doesn’t have to be completely pureed – a few chunks are okay)

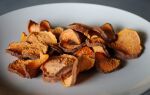
- Pour onto a dehydrator fruit roll sheet or cookie sheet lined with parchment paper and smooth to an even consistency. The roll will dry from the outside in, so it is okay to have the outer edges be a little thicker

- Dehydrate at 135 degrees or bake at 200 for 4-8 hours, until pliable (it should be almost transparent. You may have to remove the edges and continue drying the middle a little longer (I did)

- Use a pizza cutter to cut into strips
- Roll into wax paper or parchment paper, and store in an airtight container