Friends, today I have a special guest post for you, and I’m excited because I know many of you want this info!
Reader Robert, AKA “Mr. Bob,” was kind enough to put together a super thorough “how to” guide for using the Ninja Professional Prep System. You guys know I pride myself on thorough reviews and documentation, but I may have to move over, because this is a thorough how-to guide with plenty of photos! Be sure to read below the post for his short bio – I think you’ll be as impressed with him as I am.
My hats off and many thanks to Robert for this post. As you all know, we have been doing a remodel on our house (the third time’s the charm – I hope to stay put this time), and I don’t currently have a functioning kitchen. More about that sometime soon – there is a light at the end of this remodel tunnel, and the kitchen is moving up the to-do list. But, I just haven’t had the space to review this unit, and I am happy to be able to bring you this content anyway.
With that intro aside, I’ll hand it over and let Robert give you a virtual test drive of the Prep System.
*Editor’s note: See my full review of the Ninja Mega Kitchen System if you’re thinking of buying one but don’t have one yet…
Ninja Professional Prep System Instructions
If you obtain have the prep system, the only instructions you will receive from Ninja is a single page setup sheet which barely touches on the use of the Professional Prep System.
This single page instruction sheet provides information on the assembly of the Ninja Professional Prep unit, cleaning hints, and very important safety cautions on the handling the components. Little is said on the actual purposes of the various cutting discs supplied with this system and how they may be used. This review will elaborate on the various uses for the discs.
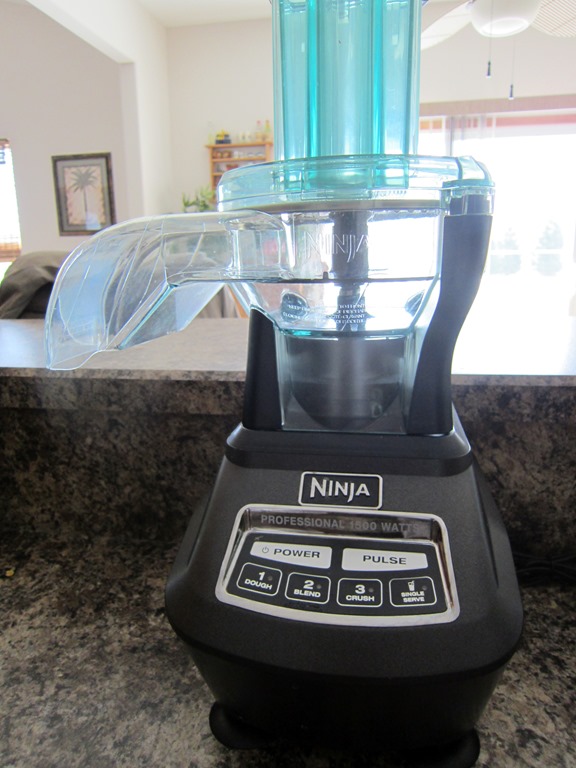
Professional Prep System Basic Components
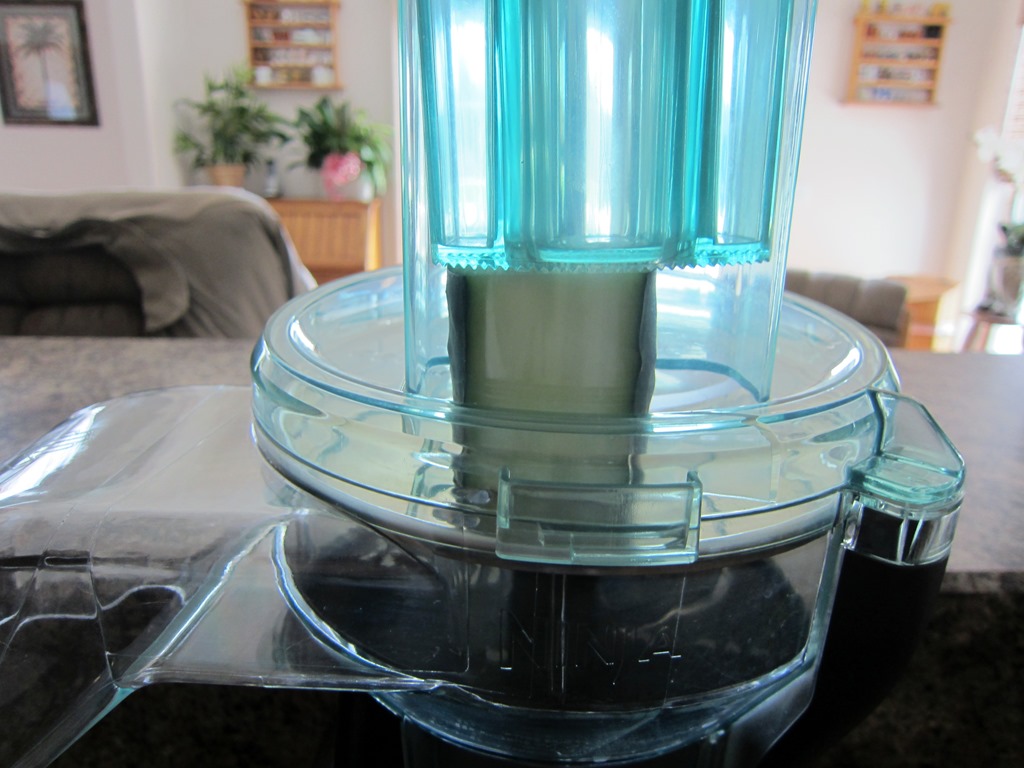
The Ninja Professional Prep Salad shooter and top chute combination sits on top of the Ninja Mega power base in a similar manner to the 72 oz. and 64 oz. containers. It is attached and removed in the same manner as these other components.
This picture shows the Professional Prep unit with the slinger disk, slicer blade, and feed chute pusher installed with the top cover attached.
The top is installed by placing it on top of the base unit and rotating in a clockwise manner until the locking tab on the top unit slides over the connecting tab on the Professional Prep base unit. There is only one way that the top will correctly close on the base unit and lock.
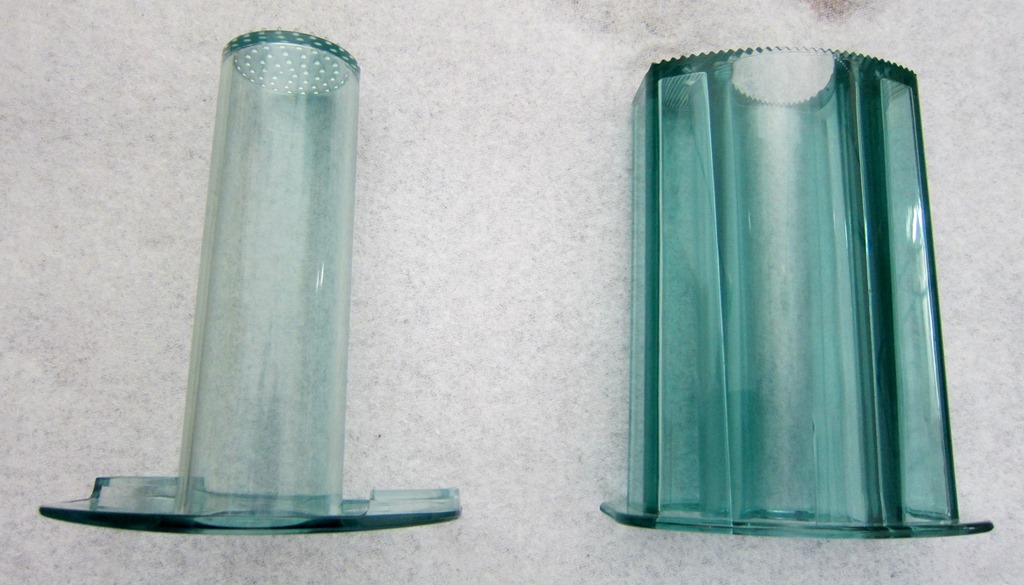
Feed Chute Pusher and Mini-pusher
Above is a photo of the feed chute pusher and the mini-pusher units. The mini-pusher cylinder fits inside the main pusher unit and only needs to be removed if inserting very small items into the processor.
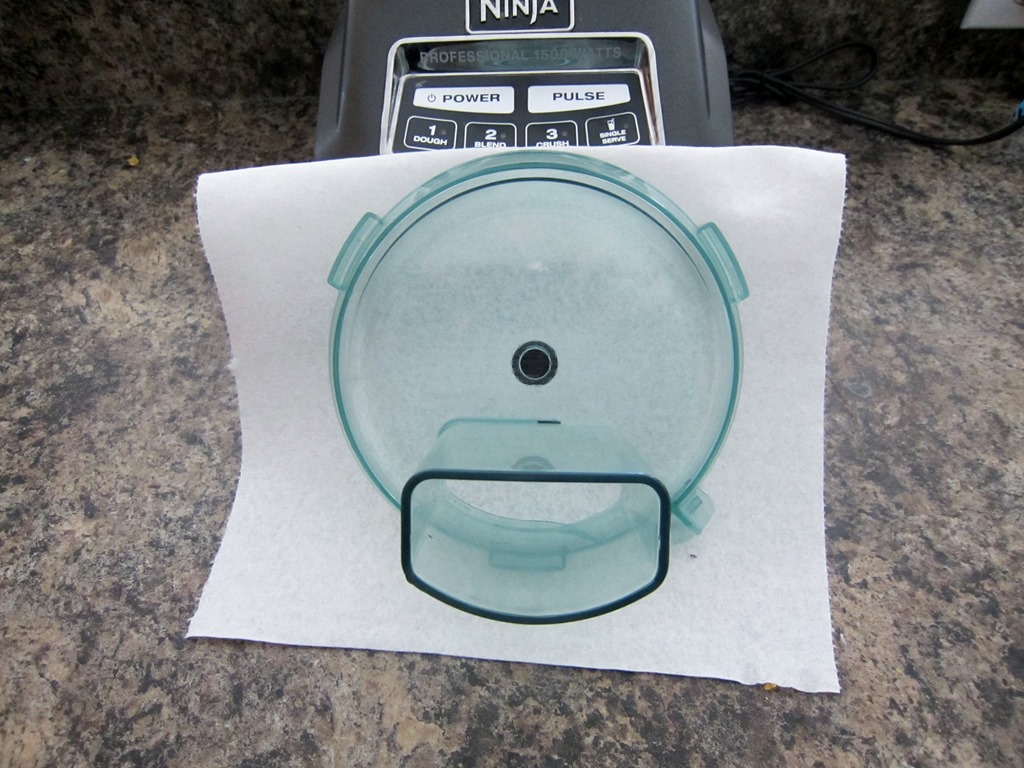
This is view from the top of the assembled Professional Prep unit. The dimensions of the maximum food item that can be entered is approximately one inch by three inches.
As an example, if you are slicing cucumbers you can usually cut the cucumber length-wise and insert half of the vegetable into the feed chute. As long as the vegetable will easily fit into the chute, it can be any length. The Professional Prep unit will continue to process until the chute is empty. If necessary, use the feed chute pusher to move food into the slicing blade. Never place fingers or other utensils in the feed chute.
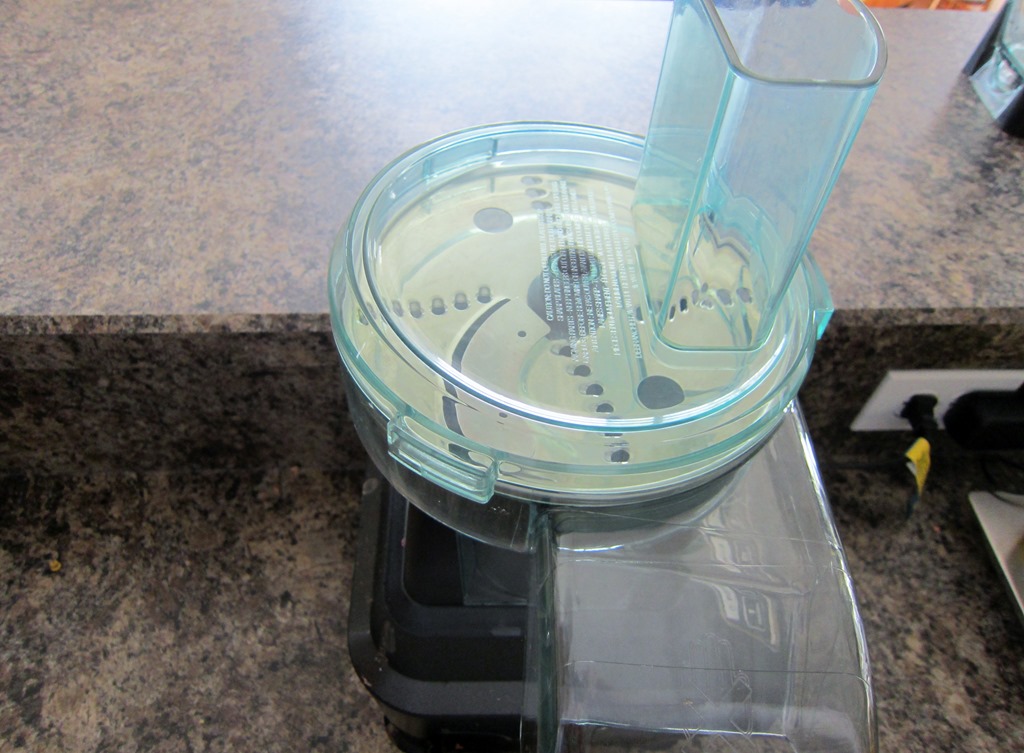
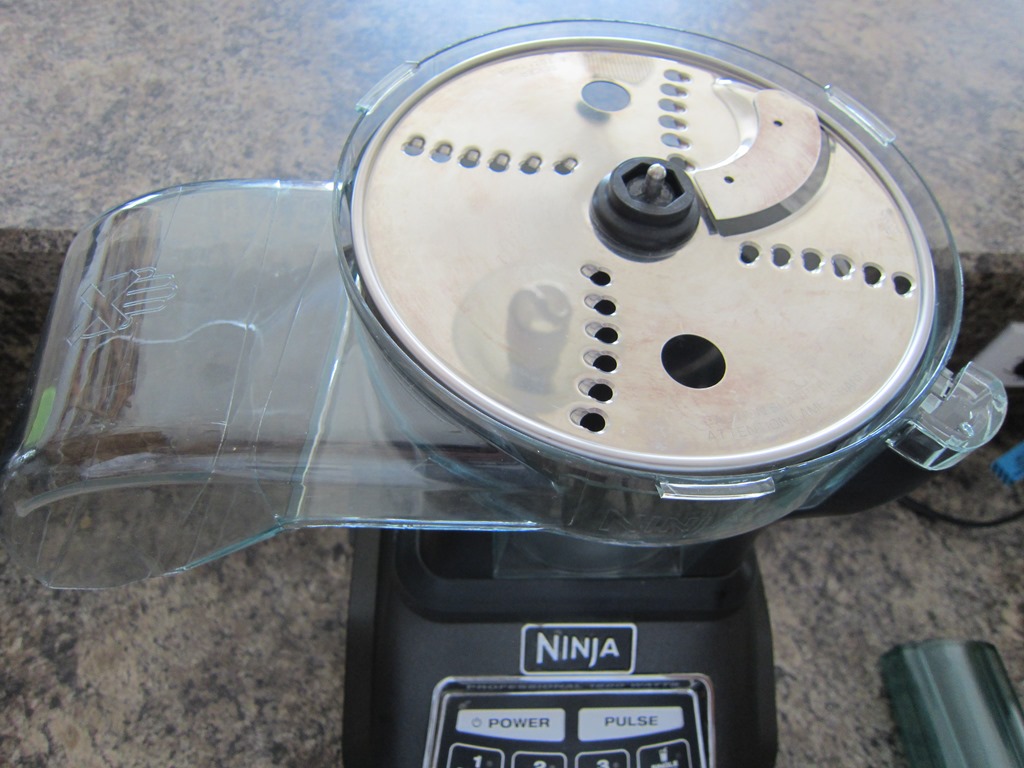
Top of Unit with Slicer Blade Installed
Here is a view of the Professional Prep unit with the slicing blade and top cover in place.
Note that the feed chute pusher/mini pusher has not been placed in the feed chute.
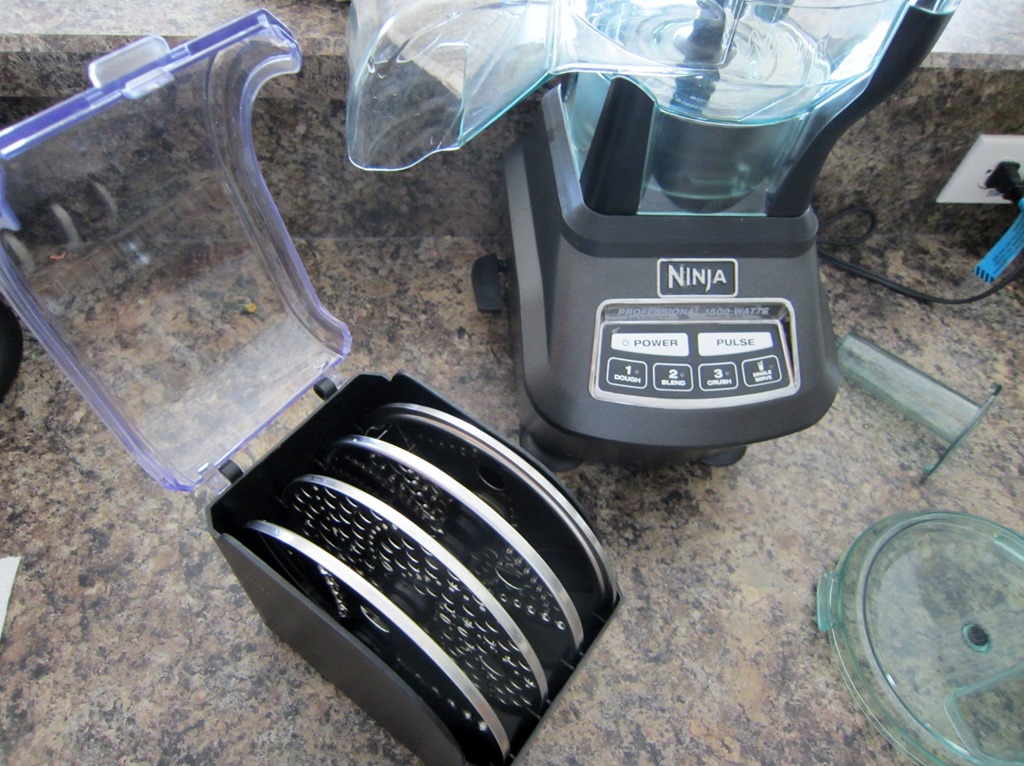
Disc Storage Box with Four Discs
A disc storage box is provided as part of the Professional Prep unit. The box provides a safe and convenient place to keep the four processing discs.
Please note that these discs contain very sharp surfaces. Please use care when removing and replacing discs into the storage box. Also use the two finger holes in each disc when placing and removing the discs from the Professional Prep unit.
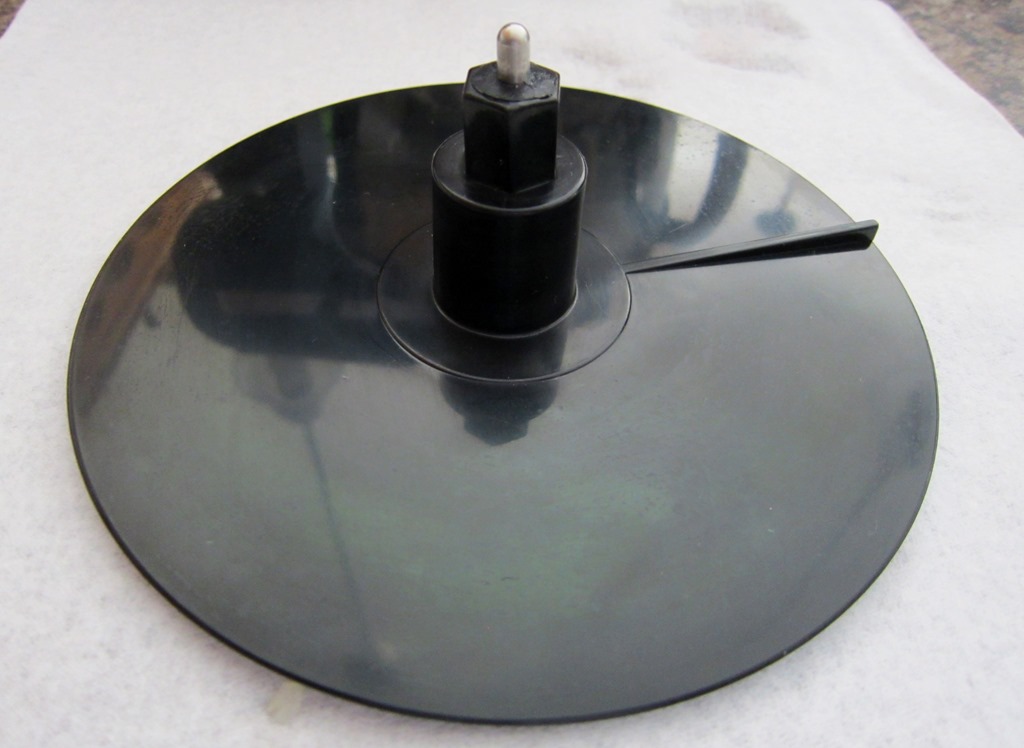
Slinger Disc
The slinger disc is inserted into base unit of the Professional Prep unit and the selected processing disc (Slicing, French Fry, Crinkle cut, Grating or Shredding disc) is placed on top of the slinger disc.
Note that the French Fry Disc and the Grating Disc will fit on the slinger disc in only one way. These are both single purpose discs. Both the Slicing Disc and the Crinkle Cut Disc can be reversed exposing a shredding capability as well.
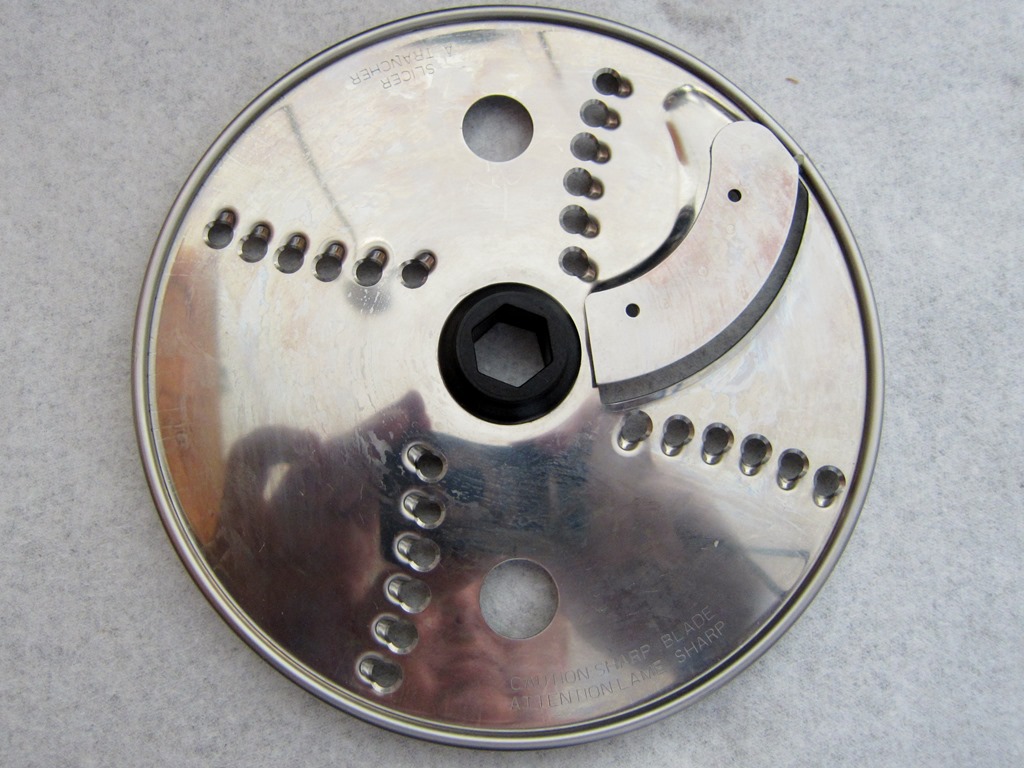
Slicing Disc and Usage
When selecting the slicing disc, note that slicing blade is raised on the slicing side and the word SLICER is embossed on the disc. Use the finger holes to place the disc on the six-sided post in the center of the slinger blade. The slinger blade is designed to eject (sling) out the sliced vegetables out thru the side chute of the Professional Prep unit.
You may wish to prop up the bowl used to collect the sliced vegetables so that the bowl is right under the exit of the discharge chute. This will give you both hands to handle insertion of the vegetables to be processed. Note that the processed vegetables will be ejected at a high rate of speed. The Ninja is fast!
The image below shows the Professional Prep unit with the Slicer disc installed and a section of a cucumber (cut to fit) inserted into the feed chute with the feed chute pusher placed into the feed chute on top of the cucumber. The weight of the feed chute pusher/mini-pusher is usually sufficient to move items in the feed chute into the cutting discs. Long items (six to twelve inch sections of cucumbers) can be inserted into the feed chute without the feed chute pusher.
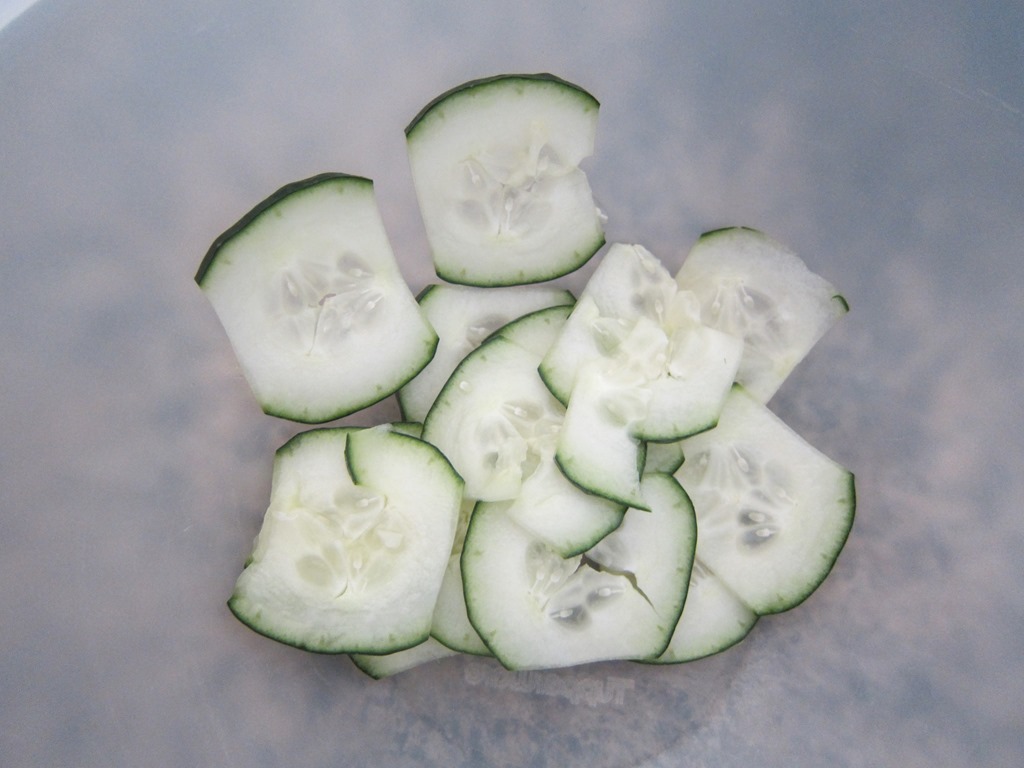
And, here are the resulting slices of cucumber. I used the “2” power button to process the slicing operation. The individual slices were about 1/8 inch in thickness.
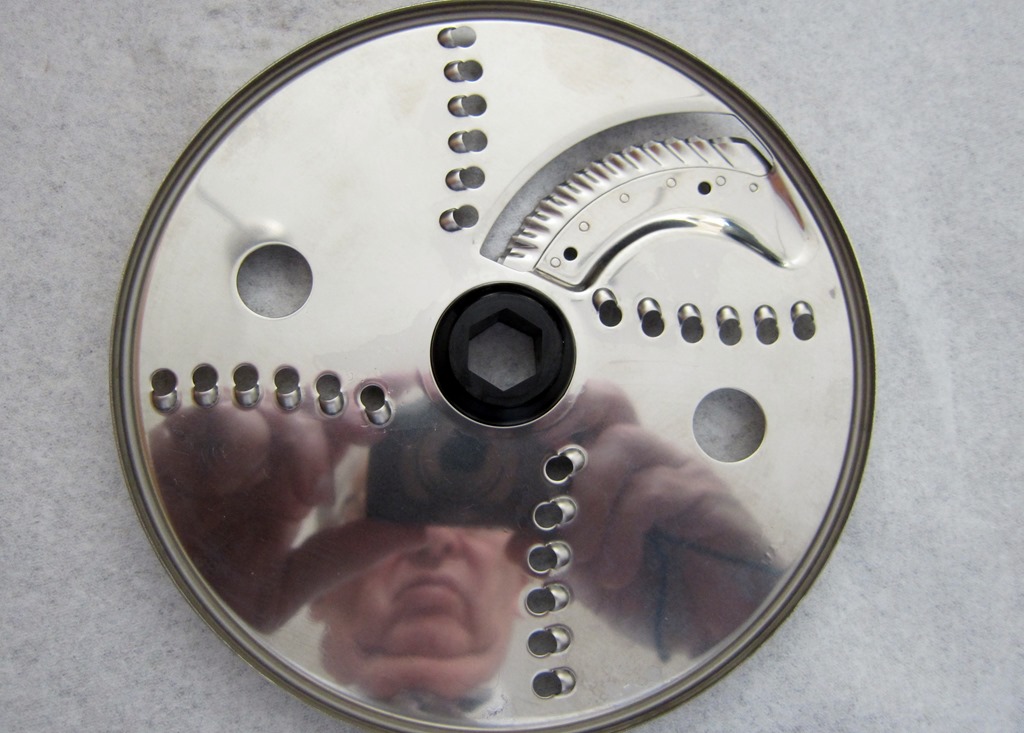
Grating Disc and Usage
The Grating Disc is used to finely grate cheeses and vegetables.
The disc has only one side available for grating. Be sure to place the disc on the slinger disc hub with the six-sided portion of the central hub of the grating disc so that it fits the similar shape on the slinger hub.
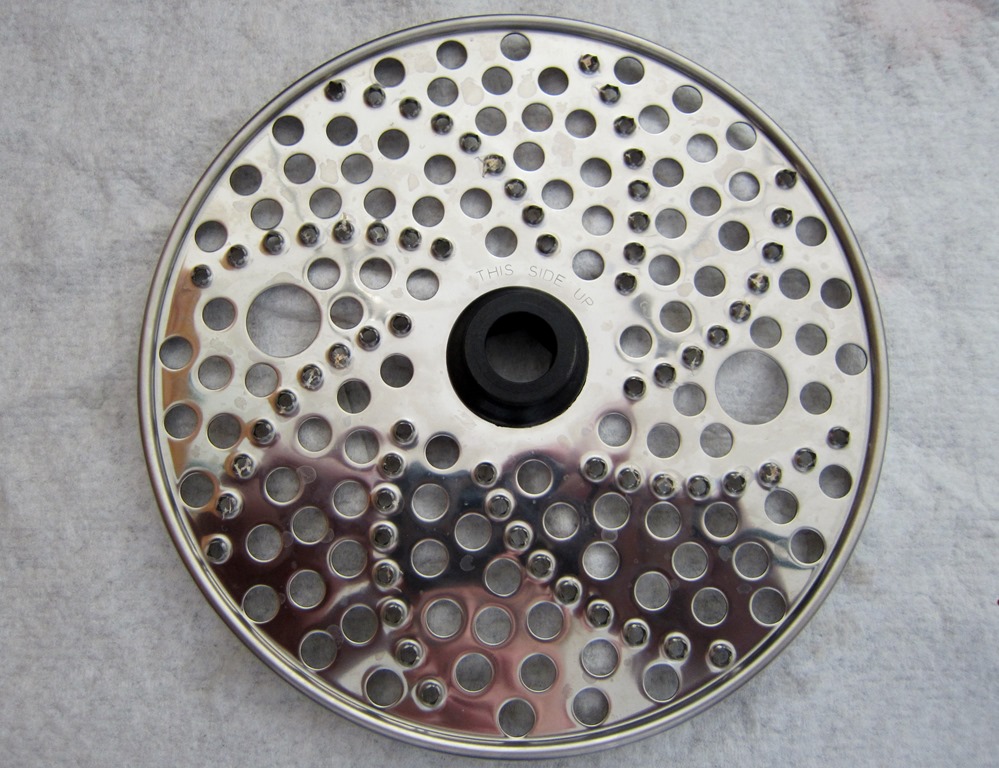
Note that the Grating Disc has an embossed “THIS SIDE UP” near the center of the disc.
Again, please be concerned for safety and use the finger holes to place and remove this and the other three discs.
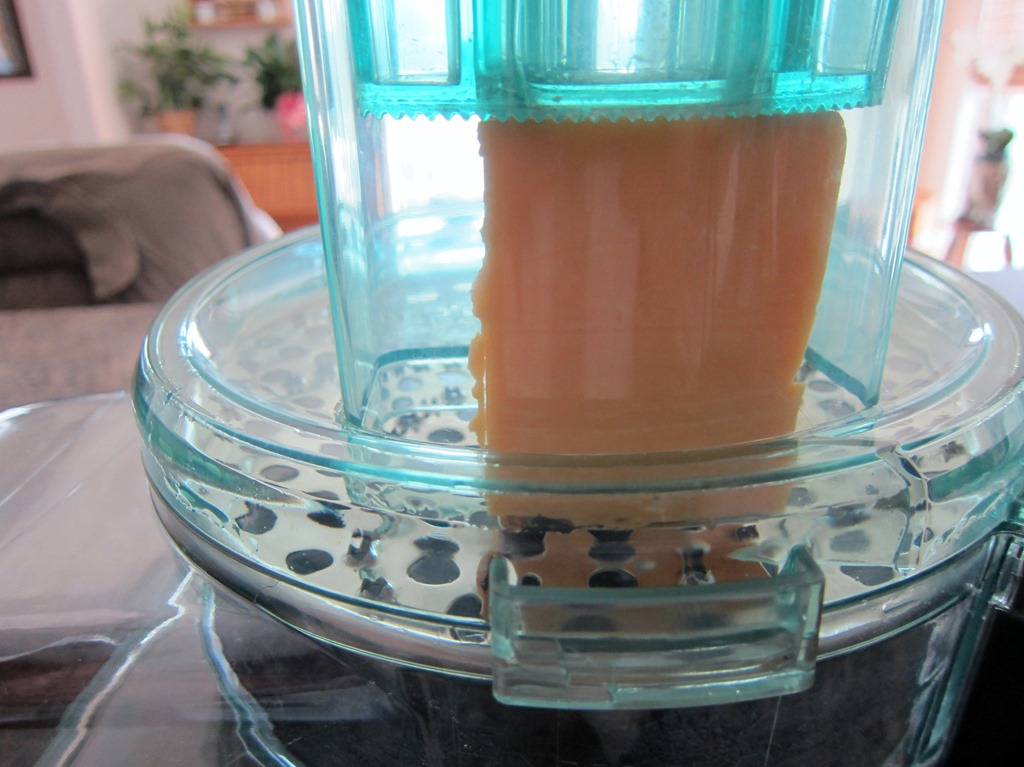
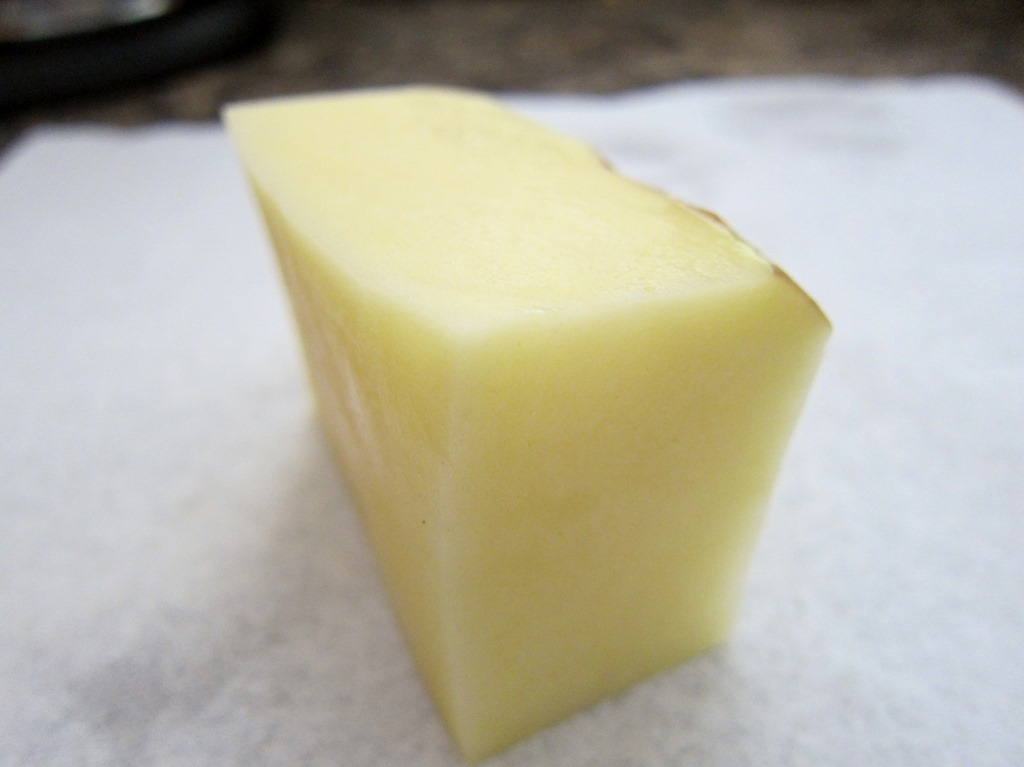
Above is a block of Colby cheese placed in the feed chute of the Professional Prep unit with the feed chute pusher positioned on top of the cheese. And below is the the resulting grated cheese. I used the “2” power button on the base of the Ninja Mega Kitchen System.
French Fry Disc and Usage
The French Fry Disc is a single-sided cutting disc designed to create French fries from potatoes. The design of this disc will only allow the disc to be installed correctly on the central post of the slinger blade. The top side of the disc has “FRENCH FRY” embossed on the edge of the disc.
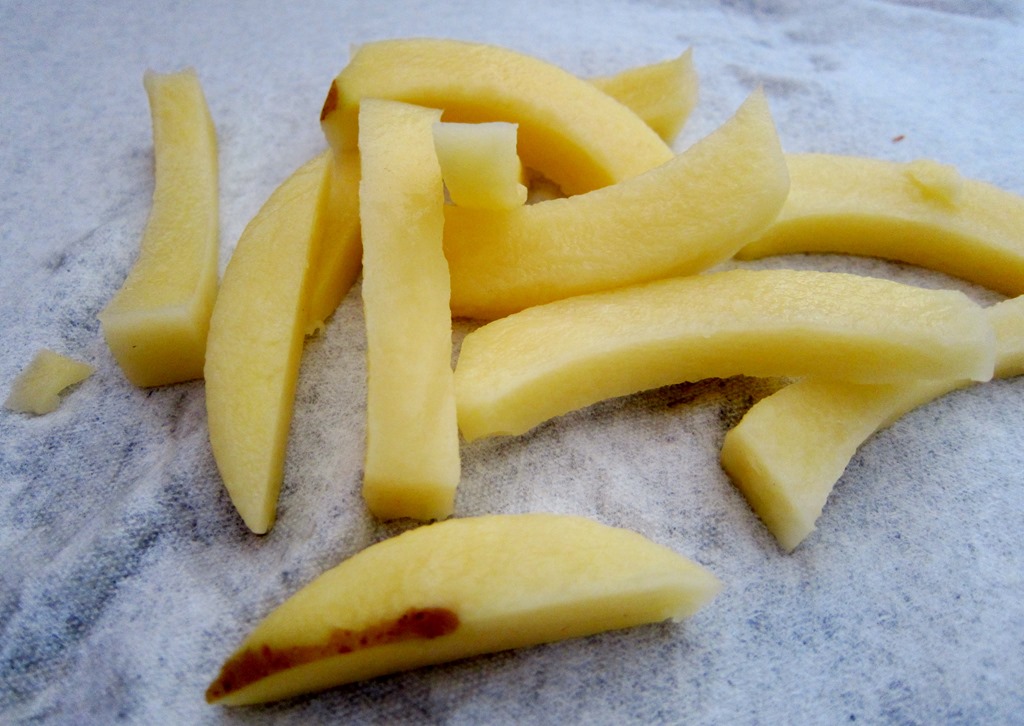
Note that the longest length of created fries is accomplished when the potato is cut into a one by three inch shape to fit the feed chute. The length can be as long as the potato will allow.
I cut this potato into a block of approximately one inch by three inches so as to fit the feed chute.
And, here are the resulting French fries produced by the French fry disc. Because the blade of the disc is cutting the vegetable perpendicular to the width of the feed chute (about three inches), the resulting fry come out in a length of about three inches long.
Crinkle Disc and Usage
The Crinkle Disc is a dual purpose disc that offers a shredding capability on the reverse side. Note that the crinkle side of this disc is placed so that the crinkle slicing blade is above the level of the rest of the disc when placed on the post of the slinger disc.
The words “CRINKLE DISC” appear on the side of the disc that is to be placed on top of the slinger disc.
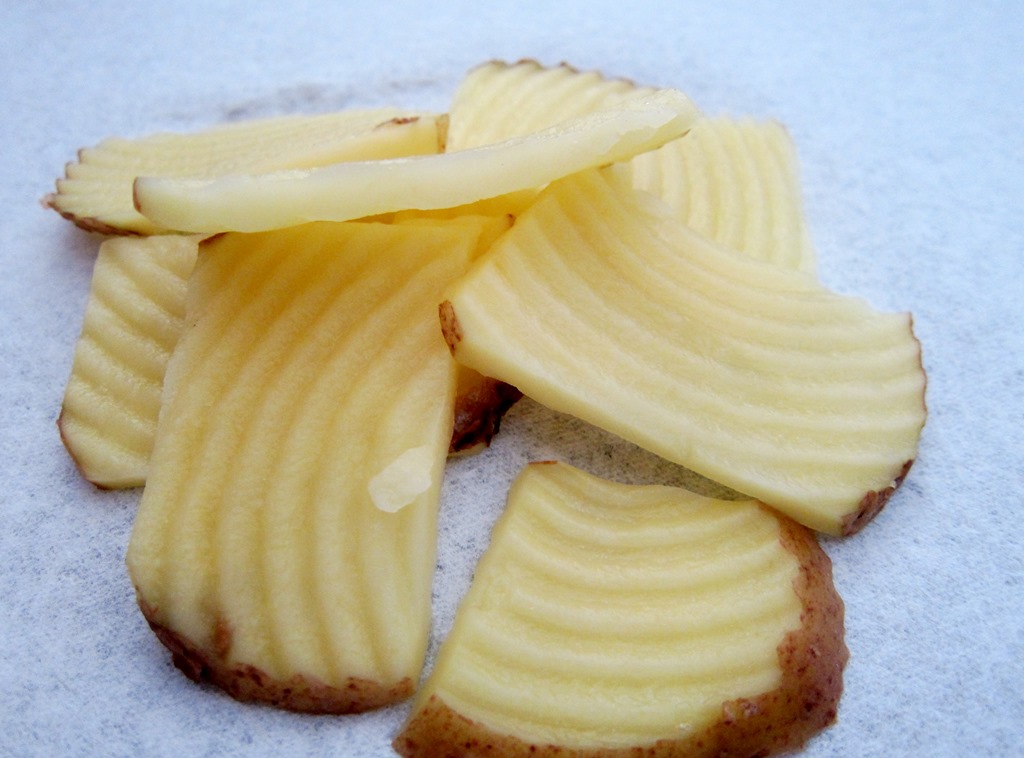
Here are the results of processing a potato segment thru the Crinkle Disc of the Ninja Mega Kitchen System Professional Prep unit. As with the use of the Slicing Disc, the individual slices of the vegetable are about 1/8 inch thick. As you can see from the image, a crinkle or wavy surface is created on one side of the sliced vegetable. Potatoes, beets, and carrots would be suitable for this treatment.
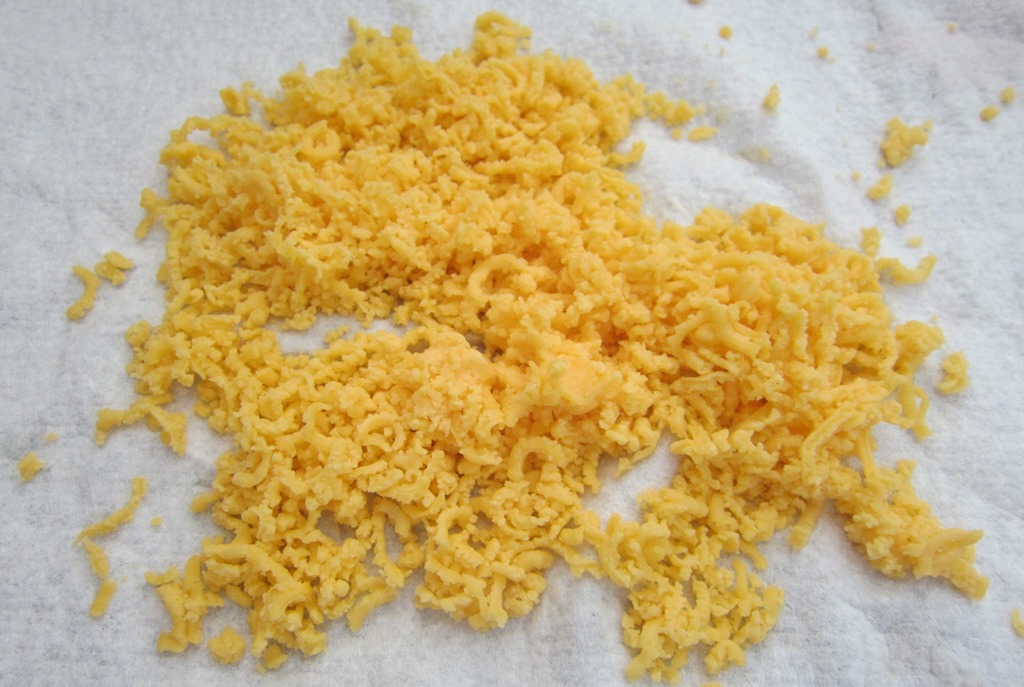
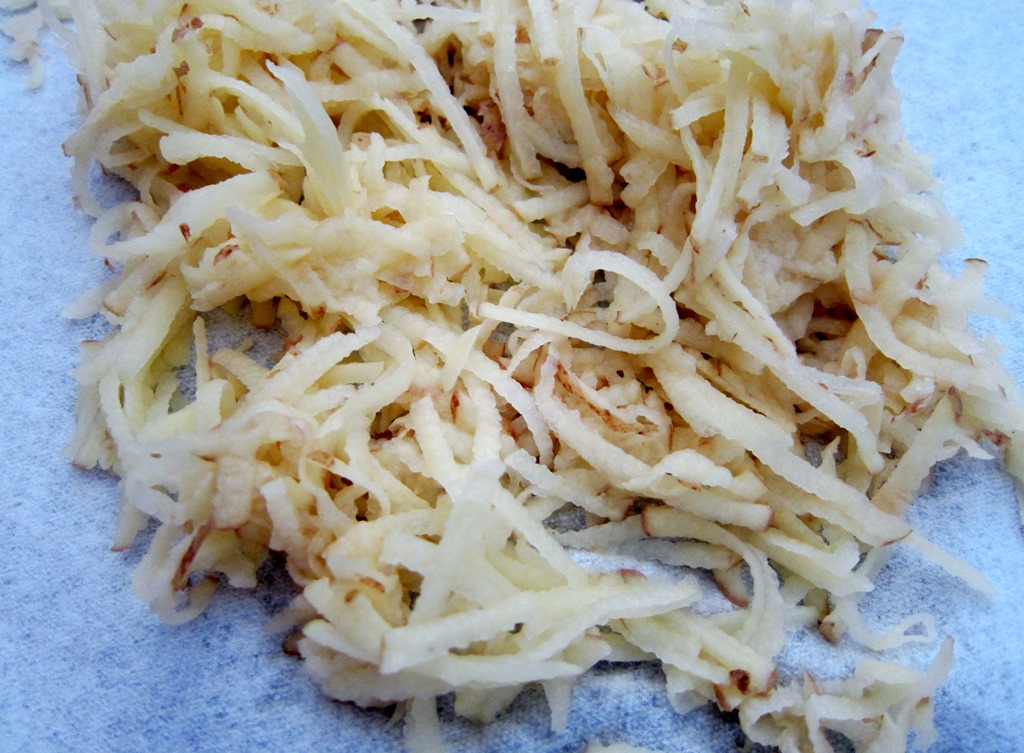
Shredder Disc and Usage
The Shredder Disc is used to shred potatoes and other vegetables into strands (think home fried potatoes). The shredder feature is found on the reverse side of both the Slicing Disc and the Crinkle Cut Disc.
The image shown here is of the reverse side of the Crinkle Cut Disc. The disc is placed on the slinger disc so that the blade portion of the crinkle cut blade is on the bottom when the disc is placed on the spindle of the slinger disc. Note that the reverse side of the Crinkle Cut disc does not have any identification. However, the reverse side of the Slicing Disc is identified with an embossed “SHREDDER”.
This photo shows the result of processing a potato thru the Ninja Mega Kitchen System Professional Prep unit using the Shredder side of the Crinkle Cut or Slicing Discs.
Here is a nice graphic from Ninja that shows the different discs and how they are used in a more quick-reference type format.
In Conclusion
It’s Angela back for this portion of the post, as Robert didn’t write a conclusion to his write up.
But, after all that explanation, I felt it important to sort of sum this up for you. If you’re looking to ditch your food processor altogether (or not buy one), the Professional Prep unit appears to be well worth the investment. Not to sound too infomercial hokey, it literally slices, dices, shreds, french-fries, and more, and has a tidy little storage box to keep everything organized.
I have to admit that I hadn’t thought much about this accessory set, aside from having it on my “to do” list to obtain and review. With this write up, I’m sold that it is definitely a valuable addition to your Ninja Mega KS, or worth ordering with your Mega, if you don’t own one presently.
I am an almost 80 year old senior living with my dear fiancé Jean in an active adult community in Lorain, Ohio. Jean and I participate in many of the activities offered at our community, including men’s and women’s poker, water aerobics, brain aerobics, recipe club and vine (wine!) club.
There are a lot of eating activities including the monthly dinner night out, two coffee and conversation breakfasts a month, a monthly pot luck dinner and not to forget our men’s Tuesday morning breakfast with the ROMEOs (Retired Old Men Eating Out). I have six children and seven grandchildren scattered around the United States.
My educational background includes a BS in Chemical Engineering and a MS in Engineering Administration from Case Institute of Technology in Cleveland, Ohio. My active life work evolved from Chemical Engineering research and design into a long career in computer information analysis and design. I have a great love for classical music, especially piano and classical guitar. Recently, I expanded my experience horizon by getting involved with cooking. Hey, cooking and chemistry are both about recipes, ingredients, and proper blending to achieve an excellent result.
Infected with the Ninja Curse
In December 2013, my Jean suggested that I help her find the best deal on a Ninja Mega Kitchen System for her daughter and son-in-law. They had seen the infomercial on this product and suggested that the Mega system would make a very nice Christmas present for their family. I went to work on the Internet and came up with the Ninja Factory special package on the Mega Kitchen system. The description of this system seemed so intriguing that Jean and I shared a second system as our Christmas gift to each other.
Naturally, with my engineering and scientific background, I tore into the Mega Kitchen System by trying all of the various components. The bonus Professional Prep component that came with the Ninja-site package left a lot to be desired in regard to usage. My documentation on this unit is a result of trial and error experiments in using this component of the Ninja Mega Kitchen system.
###
And, with that, it’s a wrap here on the Ninja Professional Prep unit! I hope you found Mr. Bob’s documentation helpful, and, if you have any questions, let us know in the comments.
View Comments (41)
ABSOLUTELY WONDERFUL! Where would we be without obsessive compulsive (LOL) people who spend inordinate amounts of time practicing, photographing, and recording their results?
I totally agree with you, Sandra! The world needs experimenter/documenters with time on their hands! Ha!
That is how all we engineers are, lol! Loved the review. I am planning on buying one Ninja Mega Kitchen system at my local Costco. It is selling rigt now for $134.99 plus taxes. I do not think it comes with the prep unit. However, it includes the grating and shredder cutting discs.
Thank you for this post. Please pass along my gratitude to Mr. Bob as I have these blades but they have never been used. His descriptions are great and I feel I can use them without wasting time.
So glad you found it helpful, Cyndee!
Wow what a great review! Thanks mr bob!
Thank you for your kind words.
Thank you for going into so much detail. I was just about to purchase from Sears when something told me to take another look around, as I was having trouble identifying EXACTLY what came with the system. Not only did your hard work give me the answers that I needed to be confident, but you saved me money, and I am getting more accessories! BOB ROCKS!
(This goes for Angela too!)
I agree, Bob does rock! Thanks for your note and glad you found the post helpful!
Noticed the special link (Professional Prep Unit) at the beginning of your Ninja Mega Kitchen review. Nice touch!
Thanks Bob – it deserves top billing!
Thanks so much guys…this is exactly what I was looking for as it answered all my questions. Before ordering Ninja I wanted to know more about this ‘Professional Prep. System’ as they are charging $ 60 extra under the name of ‘bonus’ or ‘gift’ as outside I can purchase the same unit for $ 120 the only advantage is I do not have to pay extra shipping if I order from them. I was on the fence, but your review helped me a lot…appreciate your efforts.
Glad you found it helpful, Megan!
If you review the start of my article you will find a link to the Ninja web site offering a special on the Ninja Mega Kitchen System with free s/h.
The special package also includes a free “Professional Prep system” and a “frozen Juice bar and Ice cube tray”. If I remember, the complete package was about $178.00.
The special offer also includes an option to get a second system for 50% off.
good luck on your shoping
I am in the market for these items. Thanks for this post. It was very helpful!
How do I find the master prep system. I followed mr bobs instructions but this was not available in the parts and accessories as indicated. I checked local retailers (kohls, bed bath & beyond and jc penny’s) with no success. I REALLY would like to find this product. Love love love my ninja mega kitchen and ninja chopper and woul like to add the professional prep system to my ninja family.
Hi Gail,
Wow, it looks like they don’t have it on their website right now! I don’t know if it’s sold out or what. I’ll do a webchat with them on Monday to ask. But, you used to be able to order it from the parts & accessories tab that I linked to above.
I’ll see what I can find out and get back to you Monday!
Angela
Angela,
Followed up on my Ninja Mega link at the start of this article. Link now does not offer free S/H or the free Professional Prep unit.
I used the Chat function at Ninja to get a new link which offers the Mega Kitchen System for $179.80 including free S/H, VIP 5 year warranty and the free Professional Prep Package.
I called Customer Service to see if the Professional Prep unit was available from Parts (not shown on the Mega Kitchen site). They indicated that the Mega System Professional Unit has been discontinued as of September 01, 2014! I don’t know if an order from the special Mega System link would still have the free Professional Prep unit available. Looks like my order of two systems in December 2013 was a lucky short window into the many special offers that Ninja throws out over time.
Please edit my intro text involving the processing of ordering the special Ninja Mega package which included the Professional Prep unit. Pass on info to Gail S.
I don’t know how much use your readers might get from the new link described above. If you want it, please E-Mail request and I’ll respond. Have a good Fall Season.
Bob, thank you very much for all the legwork! I will get the post updated today to reflect this new info. I can’t believe they discontinued the prep system! It must not have sold very well.
Appreciate all the info – have a great fall yourself!
I have this unit and want to sell the bowl and shooter lid. You can purchase the discs separately on the website. I will sell the shooter lid and bowl for $35. I am left handed so this unit is backwards for mgr. I purchased the other bowl and processor lid so want the case and discs.
this whole package has only just become available in australia, we are so behind in some things. So your description here is very helpful as i was missing instructions on how to use the salad shooter. All up my package was $599 it was $499 for the mega system and $100 for the salad shooter that is classed as a bonus but i also got an 11 piece knife set to, If it wasn’t for your site id be so lost using my unit so thanks for all the information you’ve got on here
Glad you are finding help on the site, Lisa. Happy blending/chopping/shredding!
Angela
I just wanted to inform those ninja enthusiast out there. This Ninja Prep system is NOT discontinued. If you go onto Ninjakitchen.com and get there contact phone number you are able to order it via phone. with shipping and tax it’s about $75 it is however NOT available online anymore. So Give them a call they are happy to help.
Thanks for the tip, Rob!